First log in to the portal
Before you can access the features of the portal, you need to create an account and log in.
Signing up
To create an account:
- Open the web page in your browser to log in to the portal.
- Press the Create a new account button.
- Fill in the information needed to register:
- Username
- Can contain upper and lower case letters, numbers, a period, an underscore, a dash, and a call sign.
- Password
- Must contain at least nine characters.
- We strongly recommend using both upper and lower case letters and numbers.
- Password confirmation
- Username
- After reading the terms and conditions, check the checkbox to agree with them.
- Confirm with the Register button.
Logging in
If you already have an account, simply:
- Open the web page in your browser to log in to the portal.
- Fill in your username.
- Fill in your password.
- Press the Log in button.
Permanent login
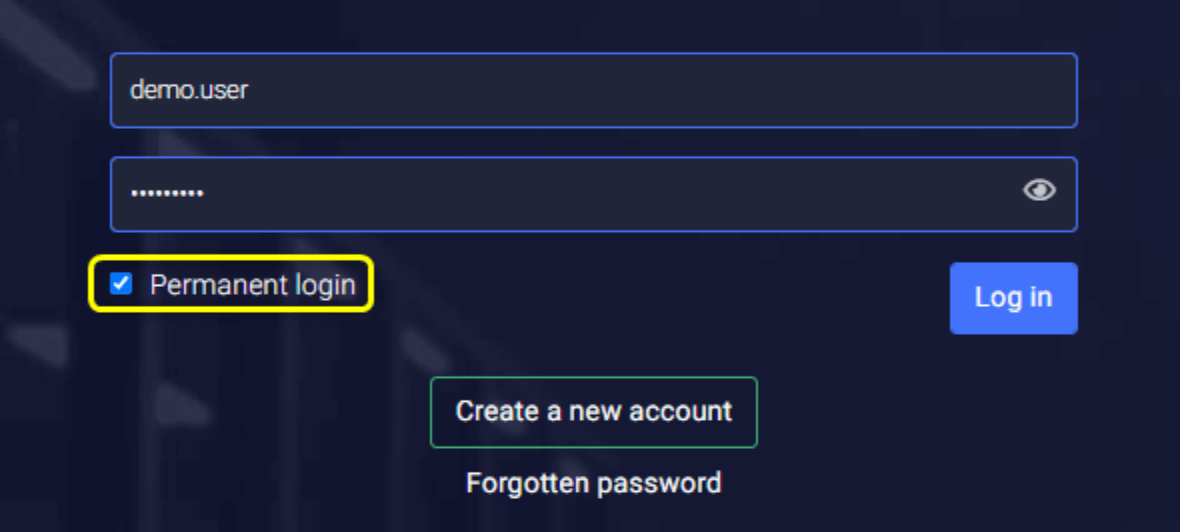
After logging in, you will be automatically logged out after 30 minutes of inactivity. If you do not want to be logged out while inactive, check the Permanent login checkbox.

Connecting first camera
Now that you’re logged in, it’s time to connect your first camera.
Adding first camera to the portal
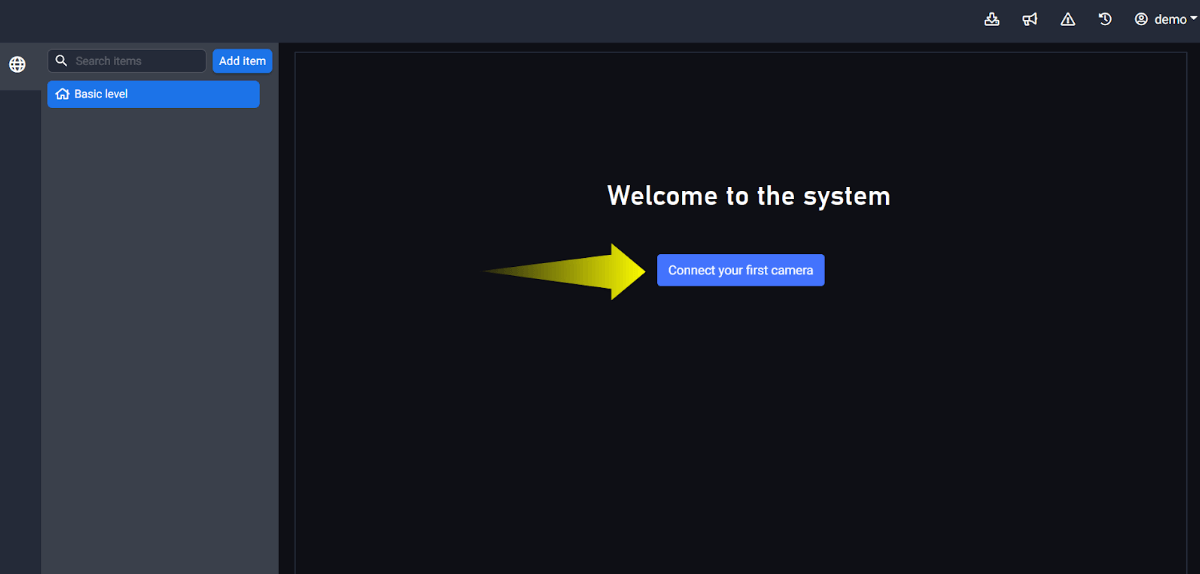
After registration, your account is empty and you can start adding a camera. On the home page you will see the Connect your first camera button.

- Press the Connect your first camera button.
- If you have already added any other item, continue with the Add item button and select Camera.
- The Camera connection wizard will open and guide you step-by-step through connecting the camera.
- Follow the instructions in the wizard.
- Once the camera is connected, we recommend that you perform basic camera setup using the Setup wizard. The wizard can be opened at any time in Camera Settings > Basic Configuration.
- Press the Configure Camera button and follow the instructions again.
NOTICE
During the connection process, the camera will change its root password. You can find the new password in Camera Settings > Basic Configuration.
Choosing a license
License means a service assigned to a specific camera. The license specifies a number of parameters that are necessary for the proper operation of the camera. Without the assigned license, the camera loses all functionality.
The license defines the following parameters:
- Primary camera function according to the selected service.
- Availability of live view.
- Parameters for remote and local recording.
- Length of retention on servers.
- Video analytics functions.
License states
The license status affects the functionality of the camera and the billing for its use. The license may be in Demo status after the first registration of the camera. After the trial period, it will automatically turn on. The license can be turned off in the camera settings.
Demo
All its features are fully available and no fees are charged. After the trial period expires, the license will automatically turn on and be charged for. A license can enter four states, which are automatically switched by the portal.
Licence turned on
- Active
- All features of the license are fully available on the camera and fees are charged.
- Suspended
- Main functions of the camera remain enabled (data storage from the camera is not interrupted), but are not available in the portal.
- License switches to this state, if you’re not paying camera fees.
- If the outstanding amount is paid, the license automatically switches to Active status again and the camera function is restored.
- Fees are still charged for a license in this state.
- Inactive
- License switches to this state, if payments for the previous period stayed unpaid.
- All camera functions are disabled and no further fees are charged.
- The camera cannot be used in the portal until all outstanding amounts have been paid.
Licence turned off
The license can be turned off manually only if the camera is to be temporarily out of service. All camera functions are disabled and no fees are charged. It is just as easy to manually turn the license back on and start using the camera again.
NOTICE
The license status does not affect the actual connection of the camera to the portal.
AXIS One-Click Cloud Connection
AXIS One-Click Cloud Connection (from now on O3C) is designed to easily and quickly connect the camera to the cloud portal without the need for any special network setup. The connection is based on the principle of an encrypted VPN tunnel.
Activation of O3C service
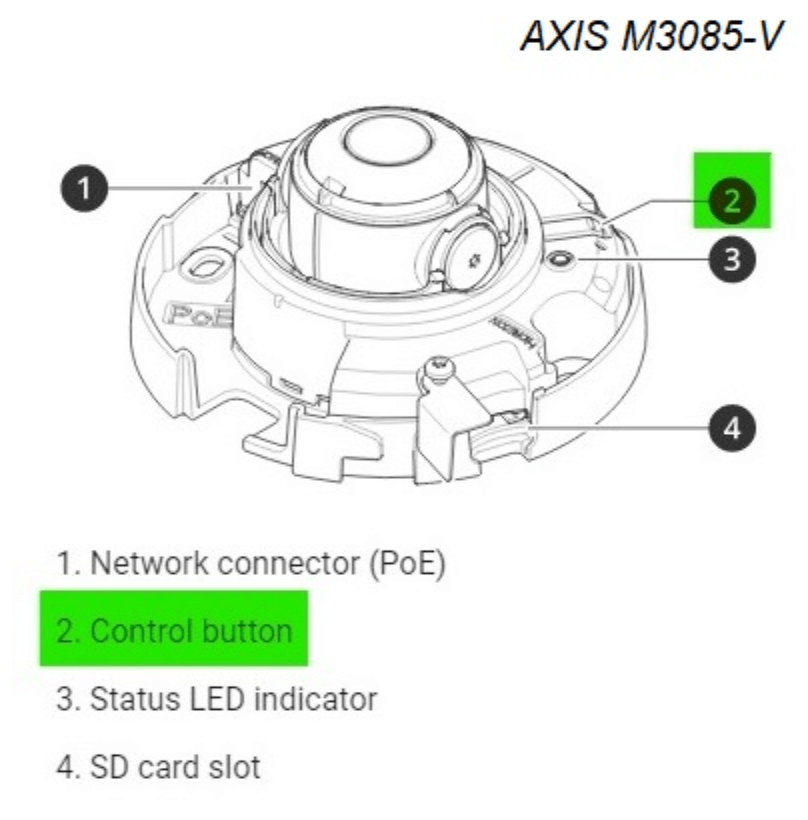
To activate the service, press and shortly hold the physical (HW) button located on the camera body.
WARNING
The O3C settings must be in the default state. If the camera has been used and you are not sure if this setting has been changed in the past, we recommend that you reset the camera to factory settings.
Where can I find the physical (HW) button on the camera?
The location of the button varies from model to model. But there is usually only one button on each camera. If you cannot locate the button on the camera, consult the manufacturer’s manual, which is available online at https://help.axis.com/. A description of the camera, including the button location, can be found in the Specifications section.

Documentation for commonly used models: AXIS M1135, AXIS P1375, AXIS V5925, AXIS Q3536-LVE.
Activation through camera’s web interface
The service can also be activated via the camera’s web interface. This is particularly useful if it is not easy to physically access the camera.
For cameras with FW version 10.* and later:
- Open the camera web interface and log in as root.
- Open the System tab and the Network settings.
- At the bottom of the page, find the One-click cloud connection setting.
- Set the Allow O3C parameter to Always.
- Confirm with the Save button.
For cameras with FW version 9.* and older:
- Open the camera web interface and log in as root.
- Open the Settings menu and go to the System tab.
- Open the O3C settings (Axis Video Hosting System – AVHS firmware on older versions).
- Set the Allow O3C (Allow AVHS) parameter to Always.
- Confirm with the Save button.
Firewall settings
If you have a strict firewall deployed on your network, then you must set the exceptions listed below. The connection is always established by the camera, so all exceptions apply to outgoing traffic only.
In order for the cameras to communicate seamlessly with our servers, communication must be enabled:
- on ports 8080 (TCP), 80 (TCP), 443 (TCP), and 123 (UDP),
- for IP address ranges 88.86.101.192/27, and 46.234.125.128/27.
The cameras use AVHS (Axis Video Hosting System) technology for connection to the system, also referred to as O3C on newer camera models.
During registration, the camera first connects to AXIS servers (called dispatchers), where it obtains the necessary certificates and is then redirected to our servers. All further connections are already made directly to our servers.
The addresses of these dispatchers, including ports, are:
- 52.51.189.141; 18.200.145.9; 54.73.167.187; 3.24.72.55; 18.215.224.182; 195.60.68.120; 195.60.68.121
CamStreamer applications
If the selected service includes the CamStreamer application, then it is recommended to enable communication on the ports for the application to work properly:
- 53 (UDP), 123 (UDP) and 1935 (TCP).
Using the portal’s interface
Interface structure
- The item tree.
- Space for displaying items.
- Portal features (TimeLapse Manager, Notification rules, Status of devices, Events).
- Account menu (drop-down list hidden under the account’s username).
- Button to enable technical support access.
Interacting with the item tree
The item tree contains all devices and items available in the portal. From the top, the folders and locations are listed alphabetically first, followed by the other items.
- Use the icons on the left side of the tree to filter items you want to see.
- The search field is used for full-text search between items.
- You can search by item name or serial number of a device.
- The Add Item button is used to add a new item to the portal.
- Any item can be marked as a favorite and its shortcut will then be displayed at the top of the tree.
- When you hover the mouse cursor over the item, a button will appear on the right side. When you press it, a menu with two buttons will appear.
- Favorites – use this to add the item to your favorites. Use the same method to remove it from favorites.
- Settings – redirects to the basic configuration page of the item.
Basic portal items
Folder
Location
Guest
Dashboard
Panel
Camera
Electric input
Removed device
- Deleted physical devices are changed into the removed device item.
- Even after deleting the device itself, some data can still be processed.
Changing the item name
- Find the item you want to rename in the item tree.
- Hover over the item name and press the three dots button that appears on the right.
- Press the Settings button.
- The basic configuration of the item is displayed.
- Overwrite the existing name.
- Maximum is 45 characters.
- Confirm with the Save button.
Removing item from the portal
- Find the item you want to remove from the item tree.
- Hover over the item name and press the three dots button that appears on the right.
- Press the Settings button.
- The basic configuration of the item is displayed.
- Press the Remove button.
- Confirm the dialog box by pressing the Confirm button
Interacting with the account menu
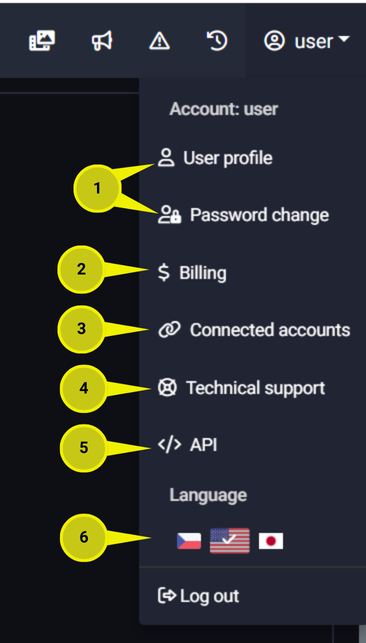
In the menu, you can:
- Manage your account.
- Manage your billing information.
- Manage connected accounts.
- Manage access for technical support.
- Manage APIs and add-ons.
- Change portal language.
- Press the button of the desired language represented by a flag symbol.

Enabling technical support
If you contact technical support in case of problems, in most cases you will need to enable service access to your account.
- Press the Technical support: Enable access button in the bottom right corner of the screen.
- Fill in the necessary information
- Allow access to
- Click in the box to open a modal window with the item tree.
- Select the basic level to allow access to the entire account or select only the specific item that the technical support agent should access.
- Allow access until
- If you want to allow access temporarily, click in the box to display the calendar in a new window.
- Select how long the access should be valid for.
- For permanent access, check the Permanent Access checkbox.
- Allow access to
- Confirm with the Allow access button.
.