The portal offers a range of features to help you manage your cameras effectively, monitor recordings, view live streams, and much more.
Camera live view
Displaying camera live view
- In the item tree, select the camera you want to display.
- A live view of the camera appears in the middle of the screen, on the right side of the item tree.
Behavior of different camera states in the portal
- If the camera is disconnected or has a disabled/restricted license, a corresponding message is displayed.
- If you are displaying a camera with multiple sensors (e.g. Axis F44), the live view of all connected sensors is displayed.
- If you select a camera dedicated to customer counting, the pass statistics are displayed in the form of a data view (charts).
Audio control
- Move the mouse cursor in the live view interface to bring up the control panel at the bottom of the player.
- Press the button to turn on the audio.
- Press the button to turn the audio off.
NOTICE
If you do not see such a button, the camera does not support audio or the audio is not enabled in the camera configuration.
Digital zoom in live view
Digital zoom is a function that allows you to zoom in a certain part of the camera image. This feature is available in live view and recordings on all cameras.
Activating digital zoom in live view
- By the button in the live view control panel.
- By scrolling upwards (the mouse cursor must be in the camera image).
- In the top right corner, a box will appear indicating where you are in the image and the zoom level below it.
Controlling digital zoom in live view
- Zoom in/out in the image by scrolling the mouse wheel or using the scroll bar to indicate the zoom level.
- You can move around in the image by grabbing and dragging the image itself or by grabbing and dragging the light rectangle in the upper right field.
- If the camera allows higher resolution playback, the Increase resolution button is visible.
- The button will only increase the resolution by one level each time.
- If the camera has multiple streaming profiles, the button will be visible until the live view is played back at the highest possible resolution.
Disabling digital zoom in live view
- Press the button in the live view control panel.
- Scroll “down” (the mouse cursor must be placed in the player).
- Scroll the zoom rate indicator fully to the left.
Saving a live view image
- Move the mouse cursor in the live view interface to bring up the control panel at the bottom of the player.
- Press the button to save the image.
- The image resolution is based on stream profile.
NOTICE
If you do not see this button, the camera does not support this function for technical reasons.
Full-screen live view
There are two ways to switch to full screen mode:
- Control panel
- Move the mouse cursor in the live view interface to bring up the control panel.
- Press the button to switch to full-screen mode.
- Double-click
- Double-click twice in the live camera view.
Use the same methods or press the ESC key to cancel full-screen mode.
Audio transmitting to the camera
The computer microphone can be used to trigger real-time audio transmission to a camera with a built-in or external speaker. Simply put – what you say into your computer or phone microphone will be heard from the audio output on the camera side.
HINT
AXIS C1310-E Network Horn Speaker or AXIS C8110 Network Audio Bridge can also be connected to the system for this purpose.
- Move the mouse cursor in the panel to bring up the control panel.
- Press the button to start transmitting audio to the camera output.
- During the transmission, the video is framed in red and information about the ongoing transmission is displayed in the upper right corner.
- Press the button to end the audio transmission.
- The transmission will also be automatically terminated when you leave the live camera view page.
NOTICE
If you do not see this button, the camera does not support this function for technical reasons.
Playing audio message on the camera
- Move the mouse cursor in the panel to bring up the control panel.
- Press the button to play the audio recording.
- All saved recordings are displayed.
- Press the selected recording to play it on the camera’s audio output.
NOTICE
If you do not see this button, the camera does not support audio playback or it is not enabled in the camera configuration.
Typically, only cameras with a built-in or connected speaker (audio output support), or a camera that has another Axis audio device assigned to the system, support it.
PTZ control
The PTZ camera can be controlled in two ways: with the mouse or with the PTZ controls. You can also set up Guard Tour, which moves the camera between set PTZ positions at different speeds.
Mouse control (1)
- Left-click in the live view to center the camera there.
- Drag the cursor to pan and tilt the camera. The cursor changes into an arrow, longer the arrow, quicker the movement.
- Hover mouse cursor in the live view and use the mouse wheel to control the zoom – the camera will zoom into the displayed rectangle.
- Press the left mouse button anywhere in live view and drag the mouse to draw a rectangle. The camera will zoom into the displayed rectangle.
PTZ controls (2)
- Drag the tilt slider up/down to move the camera position up/down. The more the slider is up/down, the faster the camera moves.
- Drag the pan slider right/left to move the camera view right/left. The more the slider is right/left, the faster the camera moves.
- Drag the optical zoom slider to zoom in/out.
- To change the current camera position, press the button under the live view with the name of the PTZ position you want to display.
- To return to your home PTZ position, press the home button under the live view.
Saving a new PTZ position
- Set the shot you want to save on the camera.
- Press the button under the live view and press Save new position button.
- Fill in the position name.
- Toggle the Set as a home position toggle bar if you would like this shot to be the default one.
- Confirm with Save button.
Guard Tour
Guard tour is an automated sequence of camera movements from one preset position to another. The camera moves between positions at a set speed and stays at each position for a defined period of time.
Individual Guard Tours can be set up only in the camera interface. You can see how the settings are done in this video.
Guard Tour controls
- Press the button under the live view to start the guard tour. Press it again to stop it.
- Press the button to open a list of guard tours. To start the guard tour, press it. Press it again to stop it.
Live view quality
- Display the camera live view.
- Move the mouse cursor in the interface to bring up the control panel.
- Press the settings button.
- In the menu that opens, press the Video quality button.
- Select the desired streaming profile from the list.
What determines video quality?
The final video quality is determined by four main parameters. In general, better video quality is more demanding on bit rate and storage capacity.
The setup file in which the camera captures the video is called a streaming profile.
Resolution
The resolution parameter indicates the number of pixels the video displays. The higher the resolution, the higher the image quality.
The resolution size is typically specified in two forms:
- number of pixels horizontally X number of vertical rows with pixels,
- number of vertical pixels + letter “p”.
For example, a resolution of 640×360 means that the video displays the image in 360 lines and each line contains 640 pixels. The 360p designation then also appears in the system.
Frame rate
The frame rate is the frequency at which the camera captures images. It is given in units of fps (frames per second) and the unit corresponds to one frame per second. The higher the frame rate, the smoother the image.
Compression
Compression is a process in which the volume of data (bitrate and size of the stored recording) is reduced at the expense of image quality. In the system, compression can be set using a percentage rate. The higher the compression, the worse the image quality.
Maximum bit rate limit
The maximum bit rate (MBR) ensures that the set value is never exceeded during data transfer. This is a handy way to save the internet connection on the camera side.
As long as the scene is static or there is little movement, the image quality will remain, depending on other settings. However, the moment the scene changes significantly, the image quality drops substantially in an effort to limit the bitrate. The bitrate limitation must therefore be set accordingly.
How is the video quality selected?
By default, the system automatically selects the most suitable video quality for transmission.
The automatic selection of the appropriate streaming profile takes into account a number of aspects. It prefers profiles with a resolution close to the size of the video player window or profiles already running and used in the camera. At the same time, it eliminates profiles with disabled automatic selection and profiles for which video compression cannot be used.
Information about the current live view
This function allows you to find out additional information about the current live view.
- Display the camera live view.
- Move the mouse cursor in the image to bring up the control panel.
- Press the settings button.
- In the menu that opens, press the Information button.
Displayed information
- Camera name.
- Model (model number of the camera).
- Transmission (remote/local).
Camera recordings
Displaying recordings
- In the item tree, select the camera whose recordings you want to view.
- The live view of the camera is displayed.
- Open Recordings.
TIP
You can also view the recordings in the same way on a camera that is part of the dashboard.
You can also view the recordings on a disconnected camera, but if you have recordings on SD card in the camera, these recordings will not be available.
Using record viewer and timeline
The timeline shows available recordings in the displayed period. Available recordings are shown in gray.

A preview image is displayed in the player area and corresponds to the position of the red cursor in the timeline (14). The axis can be moved by dragging it, which changes the time of the cursor.
The timeline can be zoomed in or out using the corresponding buttons (10) or the mouse wheel.
The timeline can be moved to a specific day using the calendar (9).
Hover the mouse cursor over any point on the timeline to display a small preview window with a snapshot of that moment, used for quick reference to the footage taken (13).
- Full-screen mode
- Digital zoom
- Save the currently displayed image
- Recording filters
- Recording quality (source)
- Start playback
- Turn the sound off/on
- Playback speed
- Calendar
- Zoom in/out timeline
- Download a recording
- Deleting a recording
- Quick thumbnail
- Timeline cursor
NOTICE
The quick preview image (13) can only be loaded if the cloud recording is available.
Playing the recording
- Open the recording interface on the selected camera .
- A preview image is displayed, with the red cursor positioned in the time.
- To play a recording from a different time, drag the timeline or use the calendar to select a specific date.
- Press the button and the recording starts playing.
- If no recording is available at that location, the next available recording will start playing.
- To stop playback, press the button.
TIP
For fast and efficient viewing of the recording, we recommend:
- use SmartSearch or other recording filters,
- set a higher playback speed.
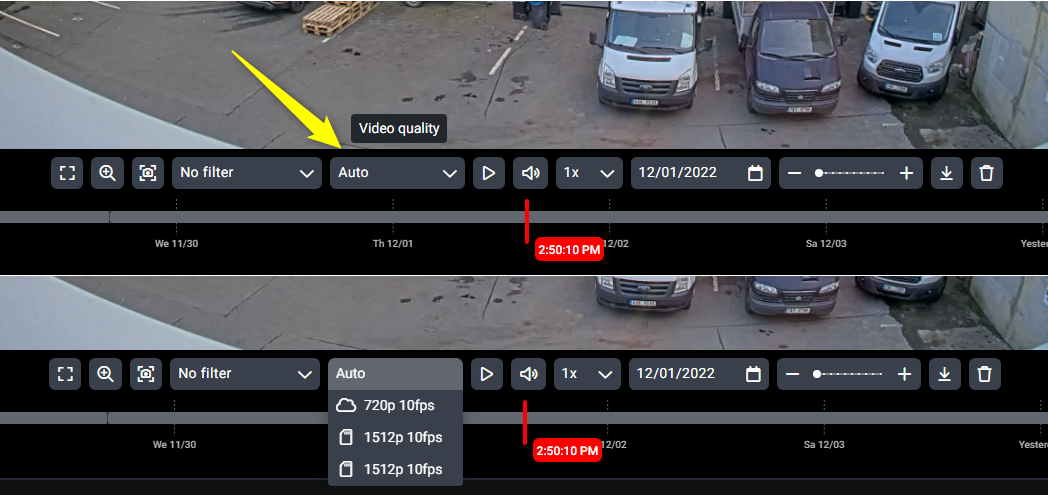
Changing the quality of the recording
- Press the Auto button to select the video quality.
- It opens a menu with all available sources and recording qualities.
- Select the desired quality.
The existence of the recording in the selected quality is represented by the gray color. When playback starts, only recordings in the selected quality are played back.
Types of recordings’ storage
Server
- Remote storage.
- Recordings are reliably and securely stored.
- Access to recordings is very fast from anywhere.
- A stable internet connection is required for remote recording.
SD card
- Storage directly in the camera.
- Cameras with firmware version 5.80 and higher enable secure SD card encryption.
- No internet connection required.
Network storage
- Possibility to connect your own storage area (NAS).
- The portal only checks the communication status with the device.
- Proper configuration of the device itself and data security is not addressed by the portal.
- You can find more information about network storage here.
NetRex Box
- Local storage developed by NetRex and fully integrated into the portal.
- The system monitors the status of this device and alerts you to any problems in time.
- The local network can be used to record in very high quality without the need for an internet connection.
- Suitable for use in locations with internet outages.
Storing recordings
The length of time recordings are stored depends on the assigned license and, in the case of local recording, the storage capacity. We guarantee a minimum server recording length.
It is possible to manually set a shorter recording storage time on each camera.
NOTICE
Note that if the local storage capacity is insufficient, the recording may be shorter, especially for SD cards.
With regards to the local network storage, recording storage is based on the capacity of the allocated device.
You can find out what license the camera is set to in Camera Settings > License.
WARNING
After the set length of time, the oldest recordings are automatically deleted. Recording and deletion is cyclical.
Recording playback speed
In the default state, the recording is played back at a standard, i.e. 1 times speed.
The recording can be played back at accelerated speeds (2, 4, and 8 times) to speed up the review of the recording, but also in slow motion (0.5 times) to allow easier and more detailed review of critical parts of the recording.
- Press the 1 × button to select the playback speed.
- Select the desired speed.
Digital zoom in recordings
Digital zoom is used to zoom in on the video being played. For better detail, we recommend viewing the footage in the highest quality available.
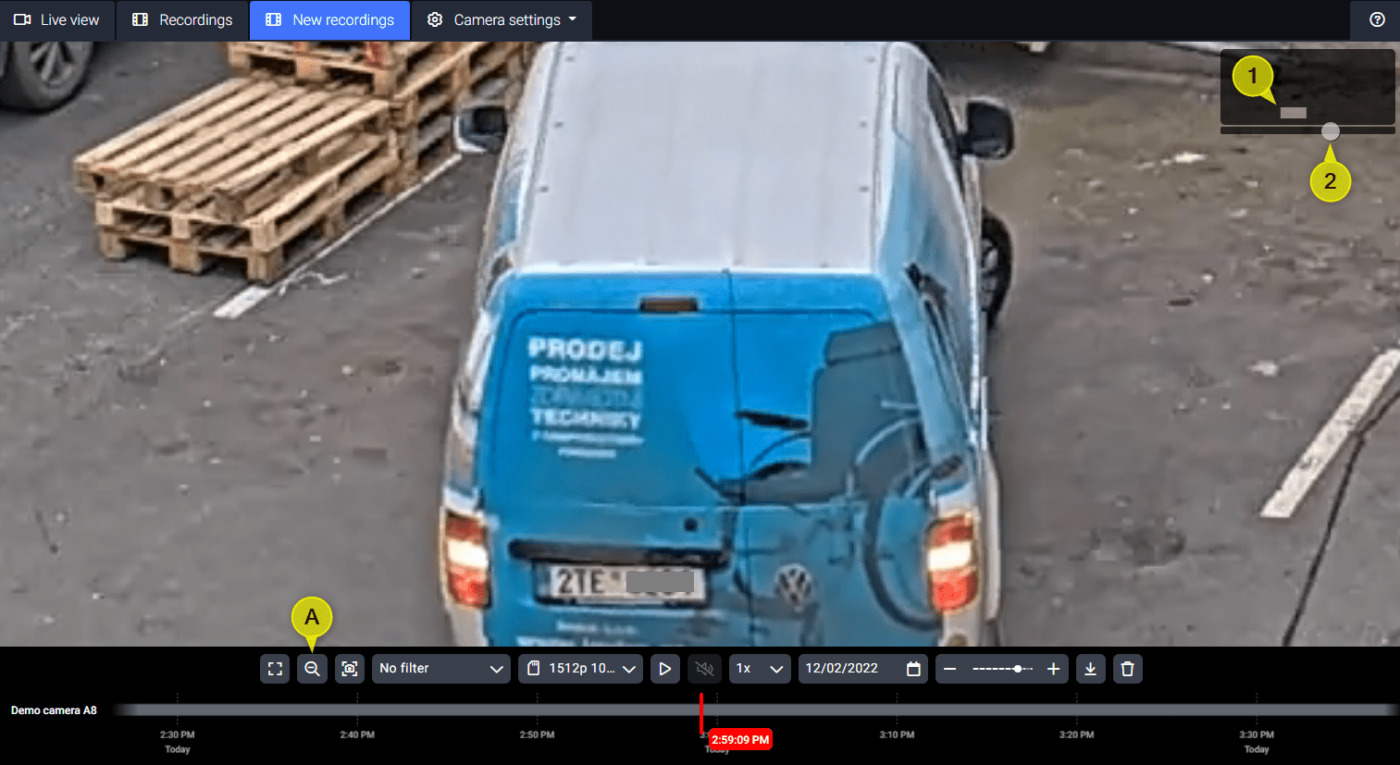
There are two ways to enter the digital zoom mode:
- Press the Digital zoom button.
- Place the cursor in the player area and start scrolling.
In both cases, a rectangle appears in the upper right corner to indicate the area of the currently displayed portion of the image and a scroll bar to indicate the zoom level.
- By grabbing the small gray rectangle, you can move it and thus move in the camera image. You can also grab and drag anywhere in the image to move it.
- Grab the scroll wheel on the slider to change the zoom level. You can also change the zoom level by scrolling the mouse wheel.
Full-screen recordings
- Press the button to switch to full-screen mode.
- Do the same or press Esc to cancel full-screen mode.

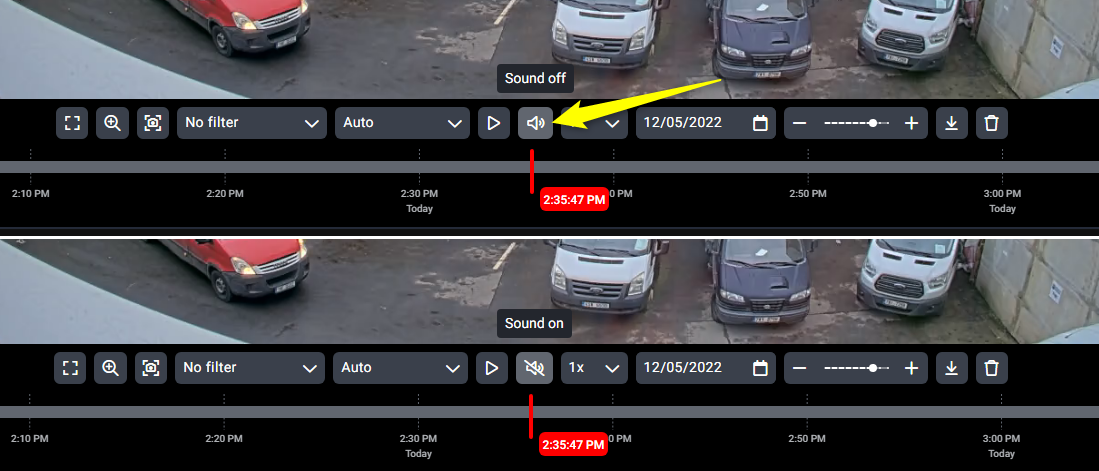
Sound control in a recordings
Press the button to turn off the sound. Press the button to turn the sound on.
When the sound is turned on, nothing can be heard in the playing recording?
This may be caused by:
- Your device settings.
- Please check the volume settings of your speakers.
- The camera settings.
- The sound was not enabled on the camera at the time of capture. The recording does not contain any audio track.
Saving image from a recording
- Select the time on the timeline from which you want to download the image.
- The image you are currently viewing is always downloaded.
- Press the button to save the image.
- The image resolution is based on stream profile.

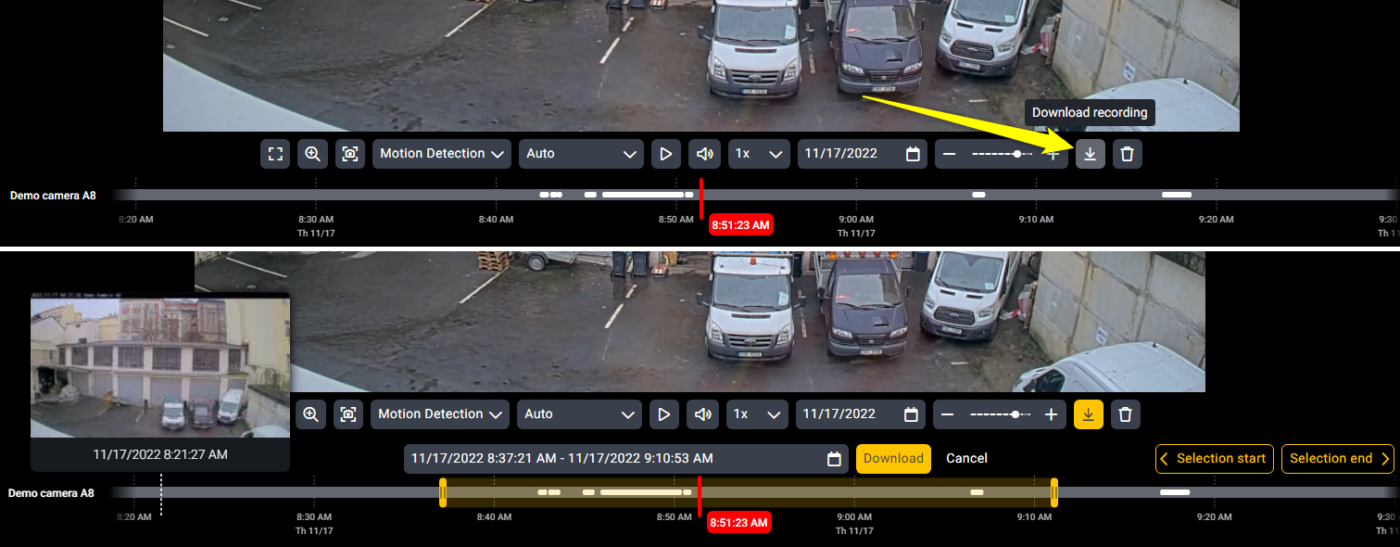
Downloading the recording
- Press the Download button.
- Other functions (scrolling or zooming in/out on the timeline, filtering and playing back the recording) can still be used.
- Select the start and end of the recording to download. This can be done in two ways:
- By dragging the yellow sliders on the timeline.
- By selecting the exact date and time using the calendar .
- Use the Selection start and Selection end buttons to scroll to the start/end of the selected recording.
- This is primarily used to verify that the desired section of the recording is correctly selected.
- Press the Download button
- Select the quality (source) of the recording from the drop-down menu.
- Press the Download button.
- The recording will be prepared and downloaded immediately. You can monitor the progress of the download in your browser’s download tool.
Recordings’ filters
Recording filters are used to efficiently view the recording. Only those time periods that meet the filter conditions are highlighted in light gray on the timeline when the filter is set. You can then see and play only the parts of the recording that are interesting.
You can filter a recording based on:
- motion detection,
- sound detection,
- camera tamper detection,
- electrical inputs of the camera (cash drawer, roller shutter, etc.),
- customer passageways,
- POS data.
All options are always displayed if they are supported and set on the camera.
Filtering
- Open the recording filter drop-down menu.
- Select the type of event you want to filter the recording by.
- All available options are always displayed.
- Areas of recordings with the selected event occurring are colored light gray on the axis and are expanded by the predefined time before the event was recorded and by the given time after the event (the so-called pre-buffer and post-buffer).
- To turn off the filter, open the same menu again and select No filter.

TIP
If you don’t see any luminous areas on the axis, there are probably no events in this time period. Try zooming out or moving the timeline.
When playback starts, all filtered segments will start playing in sequence. The playback automatically skips the parts without events.
Downloaded video will only contain the filtered portions of the recording.
SmartSearch
SmartSearch is a feature for easy and very fast search of recordings containing motion in your specified areas of the image.
When the SmartSearch function is active, the camera stores the video in a given storage and sends to the central servers information about movement in individual parts of the image. This metadata is then used for fast ex-post search of events in the footage.
SmartSearch must first be enabled by the license assigned to the camera.
NOTICE
Only cameras with Camera Connector 2 support SmartSearch (FW 6.50 and newer).
To find out which version of the application the camera has installed, go to Camera Settings > Video Applications.
Creating a new SmartSearch
SmartSearch-filtered recordings are handled the same way as other filtered recordings when viewing and downloading.
- Open the Event filter drop-down menu.
- Select SmartSearch.
- If no selection is created, you will be taken directly to the area selection interface. Skip step 3 and proceed to step 4.
- Press the New selection button.
- Use the drawing tools to highlight the desired area.
- The drawing tool is selected by default. Press and drag to make a selection in the shape of a rectangle.
- Use the drawing tool to select small areas. The brush can be resized, default size is 1×1.
- Use the eraser tool to erase selected areas.The eraser can be resized, default size is 1×1.
- Press the Erase all button, to remove all the selection drawn so far.
- Press the Show button and the axis will show a filter of recordings with movement in the selected area.
- If there are motion detections in selected areas, light gray spots will appear on the timeline showing the filtered recording.
- To change the selection or save the filter for future use, press the Edit button.
- To turn off the SmartSearch, open the recording filter drop-down menu and select No filter.
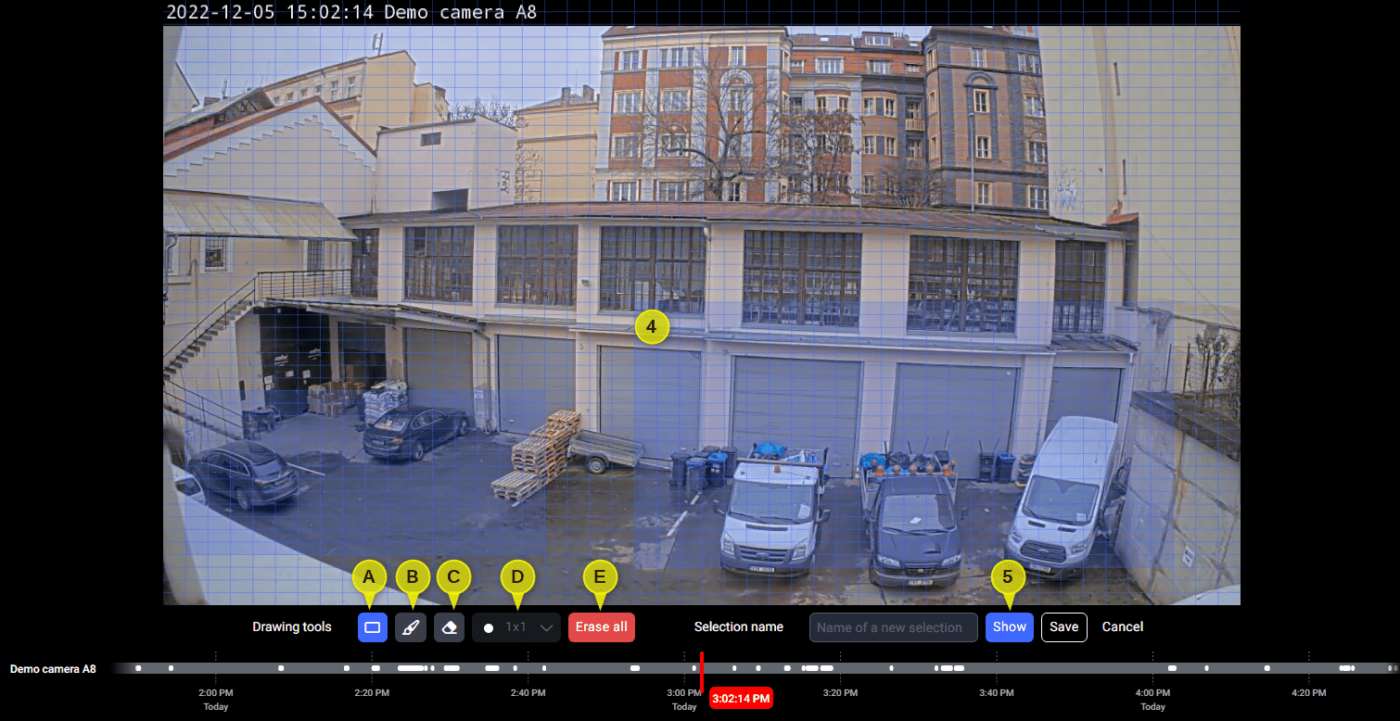
Saving the searched area for reuse
- Open the SmartSearch filter.
- Press the New selection button.
- Select the area.
- Fill in the Selection name field.
- Press the Save button.

Searching using a previously saved selection
- Open the SmartSearch filter.
- In the created selection list, select the saved selection you want to view.

Editing or deleting already saved search areas
- Open the SmartSearch filter.
- In the created selection list, select the saved selection you want to edit or delete.
- Press the Edit button to change the search area or name.
- Press the Remove button to delete the saved selection.

Deleting a recording
- Press the Delete recording button.
- Select the beginning and end of the recording to delete. This can be done in two ways:
- By dragging the red sliders on the timeline.
- By selecting the exact date and time using the calendar .
- Use the Start selection and End selection buttons to scroll to the start/end of the selected recording.
- This is mainly used to verify that the desired section of the recording is correctly selected.
- Press the Delete button
- Confirm the selected deletion of the recording with the Confirm button.
WARNING
Once a record is deleted, there is no backup from which it can be restored. Deleting recording is irreversible!
Displaying panel
A panel is an item that is used for viewing analytical data. In the portal, it’s represented by the following icon .
Any time period can be easily viewed in the panel, including comparisons with historical data. The panel can also display data from any available location. Locations need to be set up in the portal before using the panel.
Data display in the panel is handled by widgets. These have a wide range of settings options so that the panel can be customized to suit the needs of different users.
Currently, you can insert widgets with footfall data and data from the integrated POS system into the panel.
Displaying Time-Lapse
There are three modes in time-lapse preview – Browse images, Compare images and Time-lapse video. Toggle between the modes in the bottom control bar.
Browse images
Browse through all the time-lapse images taken throughout the duration of the project. There are two ways to view the images:
- Use the timeline. Images are grayed out and displayed when clicked.
- To zoom in on the timeline, hover your mouse over it and scroll with the mouse wheel, or press the plus/minus button.
- Use the arrows.
- Press the or button to view the previous or next frame.
- Press the or button to view the previous or next day’s image from the same time.
- Press the or button to view the first or last frame.
The date and time in the middle display the date and time of the currently viewed image.
- Press the calendar button and select a specific day and time you want to see.
- If the date is not clickable, the project was not running on that date.
Press the download button to download the currently viewed image.
Press the delete button to delete the currently viewed image.
Compare images
Compare two images captured at different times using a dividing line in a split view. The slide bar can be moved at will.
There are two ways how to pick the images for comparison:
- Picking date in calendar.
- Press the calendar button and choose the required date and time.
- Using the arrows.
- Press the or button to view the previous or next frame.
- Press the or button to view the previous or next day’s image from the same time.
- Press the or button to view the first or last frame.
Time-lapse video
You can play the video directly within the portal or download it.
- Press the calendar button and select the time period you want to view.
- Choose from default periods or select your own directly from the calendar .
- Select the length of video duration.
- Choose from default periods or select your own.
- If you want to use only images from a certain time of day for the video, press the Time-lapse filter button and set it accordingly.
- Click the Play button to start the time-lapse video.
- Click the download button to download the time-lapse video. The video will automatically download when ready.
Digital zoom in time-lapse
TimeLapse project supports digital zoom in browse and compare images mode, and there are two ways to activate it:
- By pressing the magnifying glass button.
- By scrolling “upwards” (the mouse cursor must be in the camera image).
In the top right corner, a box will appear indicating where you are in the image and the zoom level below it.
The feature is then controlled as follows:
- Zoom in/out in the image by scrolling the mouse wheel or using the scroll bar to indicate the zoom level.
- You can move around in the image by grabbing and dragging the image itself or by grabbing and dragging the light rectangle in the top right field.
To disable the feature:
- Press the magnifying glass button.
- Scroll “down” (the mouse cursor must be in the image).
- Scroll the zoom rate indicator fully to the left.
Export time-lapse images
Export all time-lapse images by months. Click on the months you want to download, and then press the Download selected images button. The download will start on a month-by-month basis.
TimeLapse Manager
TimeLapse manager is an overview of all your created TimeLapse projects including basic information (name, status, creation date, preview). To view it, press the TimeLapse manager button on the right side of the top bar.
In TimeLapse manager you can:
- Search for TimeLapse projects by name.
- View all created projects – running, paused and completed.
- Sort it by name, state or date of creation.
- View it in a card or list view mode.
- Create new TimeLapse projects.
- Press the Create a TimeLapse project button.
- The status is automatically set to Running.
- Fill in the Project Name.
- Click on the Parent Folder and select where you want the TimeLapse project to be in the item tree.
- Click on Source and select the camera that will be the source for the project.
- Click on Frequency and select how often the time-lapse images will be taken.
- Set the schedule in which the time-lapse images will be taken.
- Leave Always checked for time-lapse images taken always.
- Click to uncheck Always and set the times and days on which you want to take the images. You can set up to two intervals for a single day.
- Confirm the settings with the Save button, this will create a TimeLapse project.
By pressing the three dots next to a selected TimeLapse project, you can either:
- Go to the preview (also possible by clicking directly on the project card).
- Edit the project.
- Manage routines.
- Manage permissions.
Routines and permissions can also be managed by pressing the icons in the lower right corner of the TimeLapse project card.
Notification rules
Notifications is a portal feature that notifies you when a defined event occurs.
When an event occurs, the portal responds by either sending an email or sending a push message to phone or tablet.
Notifications can be triggered by any event that is recorded/logged. For more information, see the Events section.
Typically, notifications are used to notify of movement of people in the frame outside of standard hours or notification of equipment or service failure.
TIP
We recommend that you always set up a Failure event notification so that you are immediately notified (e.g. by email or push notification) when a service or device is down.
Setting up notifications
- Go to Notifications .
- Press the Add a notification button.
- Fill in the notification name.
- In the Activation conditions setting, select and fill in the necessary parameters:
- Events
- Select the type of event you want to be notified of.
- You can select an entire category or select only specific events across categories.
- The selected events are continuously listed as Selected Events.
- Subject
- Select the folder or item to which you want the notification to apply.
- If you leave the basic level selected, the notifications will apply to all items.
- Schedule
- By default, notifications are always triggered.
- Uncheck the Always checkbox to set a custom schedule.
- Checking the Edit all days at once checkbox will ensure that changes on one day are automatically written into all others.
- Check the checkboxes for each day to determine whether the rule will be active on that day.
- Pressing the button will add the option to set a second interval to that day.
- Press the button to delete the second interval.
- Time zone
- Select the time zone you are in.
- Events
- When setting the Notification type, select how you want to handle the alert by checking the checkbox. You can select multiple options at the same time.
- Email
- Fill in the email addresses where the notification should be sent.
- Separate each address with a comma.
- HTTP
- Fill in the HTTP(S) address where the notification should be sent.
- Smartphone
- Select the user to whom the alert should be sent after logging in to the mobile app.
- Email
- In the Features settings, you can change:
- Language of notification
- Notify of the following event at the earliest in. – For the selected period of time, alerts of the same type and the same element will not be sent.
- Confirm with the Save button.
Turning off notifications temporarily
- Go to Notifications .
- Press the edit button next to the alert you want to configure.
- Change the Notification Status to Off.
- Confirm with the Save button.
Removing notification rule
- Go to Notifications .
- Delete the Notification rule by pressing the remove button.
- Confirm the dialog box by pressing the Confirm button.
Using Watchdog
The portal automatically checks the correct functioning of many services at regular intervals through a watchdog. Watchdog checks everything from connecting to the device, to recording, to checking the functionality of the camera’s electrical input.
Types of device states
- Green – OK
- Red – failure
- Light red – acknowledged failure
- Grey – unknown (condition cannot be determined)
Devices with a failure also have a red icon in the item tree.
Graphical representation of device states

- Service name.
- When you click on a service, all devices that are being checked for that service are displayed.
- How many devices are being checked for the service and graphical representation of their state.
- When you tap on the colored section, a list of devices in that status is displayed.
- Service status.
- Tapping on one of the statuses will display a list of all devices and services in that status.
Detail of the device states

- Status
- The icon indicates the status of the device.
- Device
- Displays the icon and name of the device.
- Tap the device name to go to its configuration.
- Service
- The service connected to the device.
- Detail
- A brief description of what the state of the service means.
- Duration
- How long the device has been in that state.
- Action
- More Info : Press this button to display a window with detailed information about the state of the device.
- Settings : Set the schedule of the check.
- Acknowledge : By adding a comment, the failure can be acknowledged. The fault will still be visible in the device status, but will not be pointed out until it is repaired.
You can filter the overview by the device name, service name and duration of the state.
Logging and browsing events
User and device activity is recorded (logged) using events. You can be alerted to any event, and various functions can be set based on selected events (e.g. conditional recording). The various events are divided into five groups.
- User – events related to user activity.
- Change settings – events related to the portal configuration.
- Detection – events generated by the camera when detection is triggered.
- Device – events related to a device activity.
- Failure – is an event generated when checking the status of a device (checking the status of a device event).
Browsing events
You can filter, display and export events in the Events .
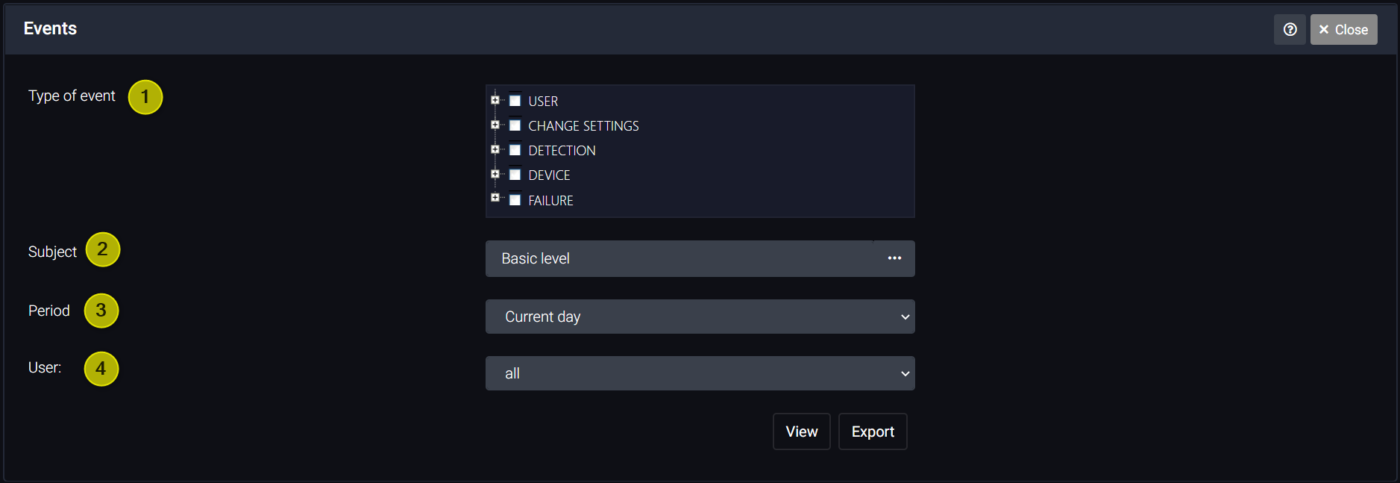
- Event type
- Select the entire group or only particular event types to search for.
- Subject
- Select the item to which you want the events to refer.
- Time period
- Select one of the presets, or select a custom time period from which you want to see events..
- User
- Select the user whose activity the events are related to.
View the event list in the browser by pressing the View button or download it to your computer in .xls format by pressing the Export button.
Accessing event detail
You can also view the event detail in the list of displayed events for more information. For example, how long the activity has been running, or what changed in configuration.
